Print Cafe of LI, Inc

Print Cafe of LI, Inc
Logo

Wednesday, September 23, 2020

What Makes A Label Great ? 

                         Color, Type Font, & Design


OUTLINE THOSE FONTS!

There are hundreds of thousands of fonts, also called typefaces, out there. And while The Print Cafe has thousands of fonts in our archives there’s a
chance a font may not exist in our system. Trying to find a font, or trying to find an analogous font, or manipulating a font to make a copy change/make a label more readable: all this increases turnaround time.
The simple solution: it’s called “outlining” fonts, and it’s a feature in most graphic design software. Basically, outlining a font converts it from a mathematical construction to a scalable series of lines and curves. When fonts are outlined, the font file associated with its respective font (.ttf, .otf, etc.) is not needed for type
to display properly. Sometimes a client isn’t particularly picky about which font to use. If that’s the case, just let us know. We’ll find the perfect one for the job!


SIZE  MATTERS

If a font is a “serif” font, you’ll notice little “flourishes” on it. If it’s a “sans-serif” font, it doesn’t have those embellishments. Most block-type fonts are san-serif fonts, and VASTLY superior for readability, especially in small print. The Print Cafe recommends using sans-serif fonts whenever possible for label work, especially for any small print that has a lot of type. Otherwise, the type will be difficult, or even impossible, to read.
    Common examples of serif fonts include Times Roman, Palatino, Book Antiqua, and New Century. Common sans-serif fonts include Helvetica, Arial, Futura, and Franklin Gothic.
 “There’s a lot that goes into a label! Your package design is your last salesperson
contact.  A typical product on a shelf has about two seconds to gain a customer’s attention.” “So think pictures first, then big bold letters, and then tackle the fine details. What are you getting across in those few seconds of ‘first glance’ is everything.”
If you don’t design a label with your audience in mind … if the label is unreadable … the most valuable sales opportunity could be missed.”

TINY SERIF TYPE DOES NOT ‘REVERSE OUT’ WELL 

If you do decide to use a serif font and you reverse it extremely small (i.e., “reverse” the type to make it white or light on a dark background), you’re going to lose detail. If you’re going to do it, I wouldn’t go any smaller than a six-point font. If you have a sans-serif font … that is, a block letter … it’s a lot easier on the eye and can get a lot smaller and read much more cleanly as a smaller, reversed-out font than a serif font.”

CMYK, ALL THE WAY

Labels are, obviously, printed. But what some people don’t realize is that printing with ink is entirely different from displaying an image on a computer with pixels. Unlike digital or online art, which is usually rendered in RGB (Red-Green-Blue) color, quality printed materials often rely on a color system called “CMYK” (Cyan-Magenta-Yellow-Black). CMYK is much more sophisticated, and thus capable of producing a much wider range of color. Even though a CMYK color may look close to an RGB color onscreen, it translates very differently on press. Richie says it best: “RGB colors are not going to print nicely in CMYK, which is our world. Colors will be dull. ”If your clients can “spec” CMYK colors, they will be happier. Even better than CMYK, however, is spotcolor printing when it’s available.
 

 PANTONE, PLEASE

As for how to “spec” that color,  “We use the Solid-Coated Pantone Color Matching
(PMS) system. Textile colors or cloth colors or even PMS Uncoated colors aren’t in our standard color processing. (FYI: PMS Uncoated colors are lighter than PMS Coated colors.) It’s wise to look up the Pantone Colors using their official online color picker to choose the Solid-Coated PMS color that best matches your desired outcome.”

VECTOR FOR LINE ART

There are many kinds of art, but we’ll deal with the two most common: “Raster” images and “Vector” images. For many label-art purposes, vector images are by far the best way to go. Raster images, which are often used to render photographs on a computer, have a set number of pixels in an image. So trying to enlarge a raster image will often result in a blurry result … all you’re doing is making the pixels bigger, until eventually they just look like squares of color. Vector images, which have been drawn or converted to mathematical calculations between each point in an image, are completely scalable. Simply put, vector images are much easier to enlarge, shrink, or edit than raster images, and will produce a sharp, “non-jaggy”
result every time.


MAKE SURE ARTWORK ALLOWS FOR A 1/8” MARGIN

“Here, we have a 1/8” printing area, meaning we have to leave 1/16” on all sides of your artwork … any imprint has to be inside that 1/16” margin” Bottom line: plan your design to allow for a sixteenth of an inch around all edges.

RESOLUTION: AT LEAST 300 DPI

Plain and simple, there’s a huge difference between how something looks onscreen and how it looks printed on label stock. While online materials are rendered at resolutions of 72-150 dpi (dots per inch) for fast uploading and display, print materials suffer terribly at 150 dpi. If you want crisp, clear art, text that’s easy to read, and images that truly pop, check your supplied art’s document settings to make sure its resolution is at least 300 dpi at actual print size. If the art is enlarged, the dpi reduces. Example: if a customer sends a 1”x1” art file at 300 dpi and enlarges it to 3 x3” the dpi plummets with the enlargement.

SOFTWARE AND FILE FORMATS

The Print Cafe primarily works with Adobe Illustrator and Photoshop software, which are incredibly powerful image editing tools. However, even these can only do so much. And we understand that customers create artwork in all kinds of programs, even Microsoft Word. Still, your best-case scenario for label art is an Adobe
Illustrator (.ai) file. We can can also work with JPEG or PNG file formats, but an Illustrator file is by far the fastest, smoothest, and best. PDF images can also work – but only sometimes. “We advise caution when saving out of programs that aren’t compatible with Illustrator. If a file is saved as a PDF file that is not compatible with Illustrator it will sometimes convert images to “nonnative” elements in the file when opened in Illustrator.

We suggest if you have a link or placed image in your art, and have saved out of a different program (not Illustrator or PhotoShop), send the image with your PDF file. We can relink the file.”


OWN IT!

Make sure your customer has purchased any stock art or images that have been downloaded from the Internet. You’d be surprised at how many low resolution images we receive complete with a stock image company’s watermark. Those watermarks exist to protect copyrighted material, and we cannot legally (let alone neatly) remove them. Remember: Rights and royalties matter!

FOR MORE INFORMATION ON THIS TOPIC-SMS TEXT 516-253-4040 or Call 516-561-1468 or VISIT OUR WEBSITE AT: www.printcafeli.com
 

Wednesday, September 16, 2020


           Knowing The Different Processes For Apparel Printing


Digital Printing

Digital printing is also known as Direct to Garment (or DTG, for short). The best analogy for describing digital printing is an inkjet printer: The garment goes through the digital printer and the design is “printed” on the surface of the garment. The ink is applied directly to the garment, much like ink to a page in an inkjet printer. A computer controls the printing process, and your image must be transmitted in a digital format.

There are no setup costs for digital printing. It is ideal for short production runs but can get expensive with large production runs. The expense for large production runs lies in the fact that digital printing is not automated like screen printing and requires that someone be present at the machine for each garment that is printed.
With digital printing, the ink layer on the garment will be thinner and the resulting colors may not be quite as vibrant as you would see with screen printing. The definition of the final image on the garment may not be as sharp on darker background fabrics, either.

The result is not of the same level of quality you would find with screen printing; however, much more detail can be captured in a digitally printed garment, and it works far better than screen printing when transferring a photographic print onto fabric. Digital printing also supports all-over prints far better than screen printing, and, because such a thin layer of ink is used, the garment remains soft after printing.
One of the key characteristics of digital printing is speed: there is no delay involved with creating screens and setting up the automated system as is required of screen printing. At The Print Cafe of LI if you need a small quantity of shirts right away, then digital printing is the number one option.


Screen Printing
In traditional screen printing, the design is applied to the garment using a screen (think stencil) based on your artwork. Ink is applied to the garment through the screen, and each color used in the design requires its own screen. Every color used is then applied one at time through its respective screen.
Because multiple screens are needed, the setup costs for screen printing can be a bit on the expensive side. However, that cost ends up being distributed over the garments you have printed. So, the more garments you have printed, the lower the cost per garment. The screen printing process is automated, which reduces labor costs once the initial setup is completed. Note that most printing The Print Cafe of LI will have a minimum order for screen printing because of the setup costs involved.
With screen printing, you can expect a thicker layer of ink and more vibrant colors. Overall, the quality that results from screen printing is very good compared to that of digital printing. And screen printing supports novelty inks, such as metallics, UV-sensitive, and glow-in-the-dark, and is also capable of successfully achieving a far wider range of colors than digital printing.
However, screen printing may not be able to capture quite as much detail as digital printing.


Sublimation
 
So how does sublimation work? Well, sublimation printing uses heat to essentially bring ink and fabric together as one.
First, a design is printed onto special paper. The inks that are used turn into gas when brought under heat, then combine with the fabric and permanently print onto the fabric. The effects are permanent and less prone to fading, as the ink is embedded in the fabric or substrate rather than simply laying on top like a normal print.
The process is almost like a tattoo, but instead of for your skin, it’s for your chosen product. The heat opens up the pores of the fabric, then with the applied pressure the ink cools and returns to a solid form.
The result is a permanent, full colour image that won’t crack, peel or wash away from the substrate. The process allows the ink to go from a solid to a gas without turning to liquid, a bit like dry ice. The conversion is initiated by heat and controlled by pressure.
This quick and effective digital print method is growing in popularity for smaller batch orders and those designs that rely on the details. Sublimation printing is also known as ‘all over printing’ as it allows you to choose a design that can literally go from seam to seam.


Embroidery
 
Embroidery is the process is turning graphic design into needle and thread art for application to the fabric. These designs can be simple, single color or multi-color intricate pieces of art.
If the fabric can be laid flat then it can be embroidered. (Which leads to the question of how are hats embroidered? But, that is the subject of another post).
Of all of the methods of fabric embellishment embroidery is generally considered to add sophistication to any work or club apparel.
What is the process?
 
Digitise the image
Custom embroidery is primarily an automated process that converts a digital image into data which guides the operation of the embroidery machine. For this to happen, the first step is to digitise the image. This may include lettering, a logo or a visual image. Digitising converts the image into stitch data which the embroidery machine can understand.
Once digitised this is sent to the embroidery machine.
Teach the machine what it has to do
The embroidery machine is then instructed which design we are working on. The correct threads are loaded onto the machine and the machine taught where to find each colored thread. So for example, if the design includes some red and the red thread is on station 12 then the machine has to be taught that when stitching the red areas use station 12.
Stabilise and hoop the garment
During the embroidery process, the garment is held in a hoop. This is a 2 piece frame which is sandwiched over the garment to keep the fabric secure during the sewing process.
Test
A test sample is stitched out using the selected design, the required thread and on fabric which closely matches the finished article of clothing. There is a wide range of stabilising options and different design and fabrics require different stabilisers.
Stitch out
When we are happy that the digitised design is correct and loaded on the embroidery machine, the garment is correctly hooped and secured, the correct threads have been selected and the machine taught where to find them, then we start the embroidery onto the finished garments. This may be a run of 5, 10 or 100 items. This is when the industrial embroidery machine earns its keep. Providing the correct maintenance is kept up to date, these machines are designed the work all day every day without missing a beat.


For More Information On Any Of These Processes or Products Go To www.printcafeli.com or SMS Text 516-253-4040


Wednesday, September 2, 2020


           Custom Labels For Your Business


Depending on the type of business you run custom labels probably play some sort of role in that enterprise. Whether it's a product label affixing directly on the product or a weatherproof label for an outdoor product, most businesses have used labels in many different ways. Type fonts, color, and design are what make labels a great attraction. A great design with colors that pop makes the product label that much more effective.


There's a lot that goes into a label to make it stick out, your label design is your last salesperson contact. A typical product on a shelf has about two seconds to grab a customer's attention. That's why a great design with pictures and bold letters is important while the fine details can come later.


What message are you trying to get across in those few seconds of a first glance is very important to the final sale. Remember labels make your company message stick for what you are promoting. That's why a great design for your product label is most important. For Information on Various Label, Products Go To https://www.printcafeli.com/store/product-view.html/81-Roll_Labels

Wednesday, August 26, 2020

The 8 Steps To Successful Brand Building


    The 8 Steps To Successful Brand Building

As a graphic designer, you know the importance of brand building. Some designers like to jump right into designing a fancy logo or business cards for their freelance business, but it’s important to build a solid brand foundation before working on those things. After all, your branding strategy needs remain effective in the long term.

To start creating your brand identity, there are important questions you need to ask yourself. The answers to these questions will become the basics of your brand building.

How to Build a Graphic Design Brand

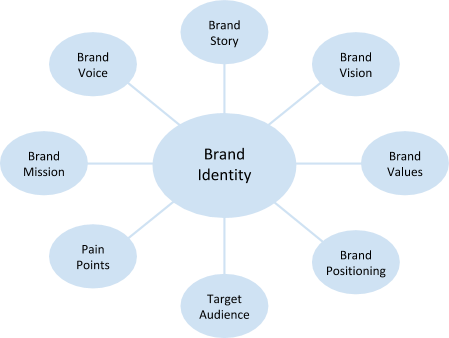
To start building a graphic design brand, answer these 8 questions first.

1. Why do you design?

Start with yourself. Who are you? Sure you’re a graphic designer, but everybody’s journey is different. Why did you start designing in the first place, and why did you continue to design? Think about what motivates you. And beyond that, why do you want to design for others? The answers to these questions become your brand story, and brand stories can eventually become powerful marketing tools.

2. Where do you want to go with your designs?

To make a plan, you need a goal. What do you want your design business to become? Ask yourself where you realistically want to be in 1 year, 5 years, and 10 years. This is your brand vision.

3. What is important to you?

If your brand vision is where you want to go, then your brand values describe how you get there. What are your core beliefs about design and about doing business? This might relate to your brand story from Question 1.

4. What do you do differently from others?

You have unique motivations, experiences and skills that are reflected through both the act of designing and your designs themselves. Think about what you do better than your competitors, or what you do differently from them. What makes your design process unique? What makes your designs unique? This differentiation becomes your brand positioning.

5. What kind of clients will want this kind of design?

You are not aiming to please everybody with your design services. Hitting a niche, or at least a specific segment of the population, is a lot stronger than targeting the general population. Will you focus on designing for individuals or businesses? Based on your brand story and positioning, do some research to understand the demographic that is most likely to give you design work. This is your target audience. You may even want to build a buyer persona around your ideal customer.

6. What problem do my designs solve for these clients?

Your ideal customer from Question 5 needs your design services for a reason. What is that reason? Identify the problems they have and why they want them solved. These problems are called your client’s pain points. Why can’t they solve these problems themselves, and why are other designers not able to solve these problems for them? And finally, think about how this client would benefit if you solved these problems for them.

7. What do you want your designs to do?

After your design leaves your studio or hard drive, what do you want them to accomplish? Of course you want them to help your clients resolve their pain points, but what about beyond that? This would relate to your core beliefs about design and potentially your brand story as well. Why does your brand exist at all? Answering these questions help you formulate your brand mission.

8. How do you tend to communicate?

Now that you have a good foundation for brand building, how do you want to communicate your brand to potential clients? The way you communicate includes both the channels that you most frequently use (e.g. social media, phone, etc.) and your tone of voice (e.g. friendly, professional, etc.). Now is also a good time to ask yourself why you use those particular channels and that tone of voice. Does it relate to your brand values and target audience? Your tone becomes your brand voice, so consider it carefully.

The answers to these brand building questions become your brand identity.


Now that you’ve answered the foundational questions to brand building, you’re finally ready to create the visual identity of your brand. And because you’ve done the background work, you’ll be able to portray your brand consistently and effectively. In addition, you’ll have plenty of material to work off of when it comes time to promote your brand.

To learn more on how to use our marketing products for Brand Building go to our website Blog at:https://www.printcafeli.com/blog/Print_Cafe_Blog.html